
Whether you’re renovating your bathroom, updating your kitchen backsplash, or refreshing tired-looking tiles, you’ve probably asked yourself: “Can I grout myself?” The short answer is yes—grouting is absolutely a project many homeowners can tackle successfully. However, understanding the techniques, common pitfalls, and when professional help makes sense will determine whether your DIY grouting project becomes a satisfying achievement or a frustrating experience. At Grout King, we’ve seen it all—from impressive DIY successes to projects that ultimately needed professional rescue. This comprehensive guide will help you decide whether to take on grouting yourself or call in the experts.
About Grout King
Grout King is Dubai’s premier specialist in professional grouting services, offering expert solutions for tile installation, grout cleaning, restoration, regrouting, and maintenance. With years of experience serving residential and commercial properties throughout the UAE, our skilled team understands both the satisfaction of successful DIY projects and the expertise required for professional-quality results. Whether you need guidance for your DIY grouting project or professional services to achieve flawless results, Grout King is here to help you make the best decision for your specific situation.
Can You Really Grout Yourself?
Yes, you absolutely can grout tiles yourself—it’s a very common and potentially satisfying DIY project that thousands of homeowners successfully complete each year. However, success requires proper preparation, the right tools, correct techniques, and realistic expectations about the time and effort involved.
The Reality of DIY Grouting:
Grouting fundamentally involves mixing powder with water in a clearly prescribed fashion, pushing that mixture into the gaps between tiles, sponging away excess, and allowing it to cure properly. When you break it down, the process seems straightforward. Nevertheless, the difference between acceptable results and professional-quality work lies in mastering the details—proper mixing consistency, working within time constraints, achieving uniform grout lines, and cleaning effectively without damaging your work.
What Makes DIY Grouting Achievable:
- Readily Available Materials: Grout, tools, and supplies are accessible at any hardware store.
- Manageable Learning Curve: Basic grouting techniques can be learned relatively quickly.
- Cost Savings: DIY grouting eliminates labour costs, making it budget-friendly.
- Small Project Suitability: Bathrooms, small backsplashes, and repair jobs are ideal for beginners.
- Flexible Timing: Work at your own pace without coordinating contractor schedules.
What Makes DIY Grouting Challenging:
- Working Time Constraints: Grout begins setting quickly, creating pressure to work efficiently.
- Physical Demands: Grouting floors requires kneeling and applying consistent pressure.
- Learning Through Mistakes: First attempts often reveal technique improvements needed.
- Limited Second Chances: Once grout cures, corrections become difficult.
- Tool Technique: Achieving professional-looking results requires practice with floats and sponges.
How to Grout Tiles Yourself in 7 Simple Steps
Step 1: Choose Your Grout
Selecting the appropriate grout type is your first critical decision, as different grouts serve different purposes.
Understanding Different Types of Grout
Sanded Grout:
- Contains fine sand particles that provide strength.
- Best for grout joints wider than 1/8 inch (3mm).
- More resistant to cracking in wider joints.
- Creates a slightly textured finish.
- Most common choice for floor tiles.
- Economical and easy to find.
Unsanded Grout:
- Features much finer particles for a smoother finish.
- Works best for narrower seams up to 1/8 inch (3mm).
- Tends to shrink as it dries, making it unsuitable for wide joints.
- Ideal for wall tiles and delicate surfaces.
- Can scratch polished stone or glass tiles if not careful.
- Smoother, more refined appearance.
Epoxy Grout:
- Premium option with superior performance characteristics.
- Waterproof and doesn’t require sealing.
- Works well for grout lines wider than 1/8 inch.
- Highly resistant to stains, chemicals, and moisture.
- Ideal for showers, pools, and high-moisture areas.
- More expensive and challenging to work with.
- Can turn yellow when exposed to direct sunlight.
- Requires specialised application techniques.
- Professional installation is often recommended.
To Mix or Not to Mix Your Grout
Grout comes in two main formats, each with advantages and disadvantages:
Pre-mixed Grout:
- Ready to use straight from the bucket.
- More expensive per square foot.
- Ideal for small jobs, touch-ups, and repairs.
- Can be opened, used partially, and reclosed.
- Perfect for beginners and casual DIYers.
- Eliminates mixing mistakes.
- Allows starting and stopping at your convenience.
Powdered Grout:
- More economical for larger projects.
- Requires mixing with water to a specific consistency.
- Must be used within working time once mixed.
- Allows precise control over consistency.
- Better value for whole-room projects.
- Requires measuring and mixing skills.
Choosing a Colour for Your Grout
Grout colour significantly impacts your tile’s overall appearance:
- Matching colours: Create a seamless, unified look that makes tiles appear larger.
- Contrasting colours: Highlight individual tiles and create visual patterns.
- White or light grout: Brightens spaces but shows dirt more readily.
- Grey grout: Versatile neutral that hides minor discolouration.
- Dark grout: Creates a dramatic contrast with light tiles and hides staining better.
- Custom colours: Some grout types accept pigments for exact colour matching.
Professional Tip: Always test grout colour on sample tiles or an inconspicuous area first, as dried grout often appears lighter than wet grout.
Step 2: Prepare the Tile Surface for Grout
Proper preparation determines whether your grout will last for years or fail prematurely.
Clean the Joints Thoroughly:
- Remove all spacers from between tiles.
- Vacuum or brush out all dust, debris, and loose material.
- Ensure no adhesive (thinset) residue remains in grout joints.
- Any debris left in joints will weaken the grout bond.
- Clean tile surfaces to prevent contamination during grouting.
Verify Adhesive Has Cured:
- Check adhesive manufacturer’s specifications for curing time
- Typically requires 24-48 hours before grouting
- Grouting too soon can shift tiles and create problems
- Moving tiles during grouting causes cracks and gaps
- Be patient—proper curing prevents numerous issues
Assess Joint Depth:
- Grout joints should be deep enough to provide proper bonding.
- At least 2/3 of the tile thickness is recommended.
- Shallow joints result in weak grout that cracks easily.
- For regrouting projects, remove old grout to an adequate depth.
Moisture Considerations:
- Tiles and joints should be dry before grouting.
- Excess moisture dilutes grout and weakens bonds.
- In humid climates like Dubai, allow extra drying time.
- Some installations may require dampening extremely porous tiles to prevent rapid moisture absorption.
Step 3: Mix and Apply Grout
This step is where technique truly matters for achieving professional results.
Mixing Grout Properly
For Powdered Grout:
Measure Accurately: Follow the manufacturer’s specified water-to-powder ratios precisely. Too much water weakens grout and causes shrinkage and cracking. Too little water creates difficulty working with the material.
Professional Tip from Experienced Grout Installers: Dry blend all powdered grout first in a 5-gallon bucket if doing a large project. Then weigh out individual small batches on a food scale, keeping identical ratios between batches. This ensures colour and consistency match throughout your project and allows you to make batches appropriate to your working time.
Mix Thoroughly: Hand mixing with a large silicone scraper or kitchen tool works excellently for small batches. Whilst drill mixing seems faster, it actually shortens working time significantly. Additionally, hand mixing gives you better control over consistency.
Achieve Peanut Butter Consistency: Grout should be thick and creamy—similar to peanut butter—holding together but still spreadable. Go slow when adding water; it’s easy to add too much, especially if you’ve been mixing thinset previously.
Slake the Grout: After initial mixing, let the grout rest for 5-10 minutes, then remix briefly. This “slaking” period allows proper hydration and improves workability.
Temperature Matters: The temperature of both powder and water impacts working time. If you need more time, chill a gallon of distilled water in the fridge or even chill the powder. Similarly, room temperature and tile surface temperature affect working time—crank the air conditioning if you need extended time.
Applying Grout to Tiles
Work in Manageable Sections: Don’t attempt to grout your entire room at once. Start with a 2-3 square metre area you can complete within the grout’s working time (typically 10-30 minutes depending on grout type and conditions).
Use Proper Float Technique:
- Hold grout float at approximately a 45-degree angle to the tile surface.
- Load grout onto the float’s surface.
- Push grout firmly into joints using diagonal strokes.
- Working diagonally (not parallel) to joints forces grout deep into seams.
- Apply consistent pressure to ensure joints are completely filled.
- Multiple passes may be needed to achieve full compaction.
Pack Joints Completely: Push firmly to eliminate voids and air pockets. Thoroughly filled joints resist cracking and provide structural support.
Remove Excess Grout: After filling joints in your working section, hold the float nearly perpendicular (70-90 degrees) to the tile surface and scrape diagonally across tiles. This removes bulk excess whilst leaving grout in joints. The right float—firm enough to distribute pressure evenly without squishing at edges—makes this significantly easier.
Work Methodically: Establish a pattern (left to right, top to bottom) and stick with it to avoid missing areas or overworking sections.
Step 4: Wipe Excess Grout with a Damp Sponge
This critical step separates acceptable results from professional-looking work, yet it’s where many beginners struggle.
Timing Is Crucial: Wait until grout has firmed slightly but hasn’t completely hardened. Test by pressing your finger against a joint—if grout doesn’t stick to your finger, it’s ready for sponging. This typically occurs 10-20 minutes after application, but temperature and humidity affect timing significantly.
Sponge Technique:
Use the Right Sponge: Large, firm sponges like car wash sponges work excellently for floor tiles. For wall tiles, household scourers with sponge backs provide good control. Professional Ardex sponges are favoured by many installers.
Wring Thoroughly: This cannot be overstated—wring your sponge out more than you think necessary. A dripping-wet sponge is your enemy. Consequently, excess water dilutes surface grout, washes colour from joints, and creates a washed-out appearance.
Wipe Diagonally: Move your sponge diagonally across tiles (not parallel to joints) with circular or gentle sweeping motions. Diagonal wiping prevents accidentally dragging grout out of joints.
Use Minimal Pressure: Let the sponge do the work—you don’t need to push hard against tiles. Furthermore, excessive pressure disturbs joints you’ve just filled and creates uneven grout lines.
Rinse Frequently: Clean your sponge in fresh water after every few passes. Dirty sponges spread grout around rather than removing it.
Shape Joints: During this first pass, you’re primarily shaping joints and removing heavy residue, not achieving perfectly clean tiles. There should only be dirty water and light haze on tile surfaces at this stage.
Limit Passes: Make 4-5 passes maximum with clean sponge edges each time. Excessive wiping removes too much grout from joints and creates “peaks and valleys.”
Common Mistake to Avoid: Beginners often wring sponges insufficiently or wipe too many times. Consequently, grout joints look washed out, uneven, or discoloured.
Step 5: Clean Grout Haze
After the initial sponging, a hazy film remains on tile surfaces—this is completely normal and expected.
Let Grout Firm Further: Allow grout to dry and firm up more before final cleaning—typically 30-60 minutes after sponging, though timing varies by grout type and environmental conditions. The grout should be firmer but not rock-hard.
Final Wipe with Microfibre: Use barely damp microfibre cloths or towels for final haze removal. The microfibre texture effectively lifts dried grout residue without scratching tiles.
Buff to Shine: Light buffing with a dry microfibre cloth removes remaining haze and brings tiles to a clean shine.
Stubborn Haze Solutions: If haze proves difficult to remove, lightly dampen it first with a barely-wet sponge, then immediately wipe with a dry microfibre towel. This rewets the haze slightly for easier removal.
Next-Day Cleanup: Any remaining light haze can be addressed the following day when the grout has fully dried. Dry cloths or plastic scour pads remove dried powder effectively.
Never Leave Grout to Harden on Tiles: Removing fully cured grout from tile surfaces requires scraping and is extremely difficult. Clean thoroughly during the proper windows.
Step 6: Seal Grout
Sealing is essential for most grout types to prevent staining, moisture absorption, and discolouration.
When to Seal: Wait until grout has fully cured before sealing. Most cement-based grouts require 48-72 hours minimum, though some products need up to 2 weeks. Sealing too early traps moisture and prevents proper curing.
Why Sealing Matters:
- Prevents stains from oils, dirt, and liquids.
- Blocks moisture absorption that leads to mould and mildew.
- Makes routine cleaning significantly easier.
- Extends grout lifespan considerably.
- Especially crucial in wet areas like showers and bathrooms.
Sealer Types:
- Penetrating sealers: Absorb into grout for protection from within (recommended).
- Topical sealers: Create a surface barrier, but may need more frequent reapplication.
- Note: Epoxy grout doesn’t require sealing as it’s naturally non-porous.
Application: Follow the manufacturer’s instructions carefully. Most sealers can be applied with a brush, roller, or spray bottle. Apply liberally to grout lines, wipe excess from tile surfaces within the specified time.
Step 7: Caulk Where Appropriate
Grouting is technically complete, but professional installations include strategic caulking.
Where to Caulk Instead of Grout:
- Where tiles meet tubs, showers, or sinks.
- In corners where walls meet floors.
- Anywhere two different materials meet.
- Movement joints in large tiled areas.
Why Caulk These Areas: These locations experience movement and expansion/contraction. Rigid grout will crack in these areas. Furthermore, flexible caulk accommodates movement whilst maintaining a waterproof seal.
Choosing Caulk: Use high-quality silicone or urethane caulk in a colour matching your grout. Many manufacturers offer colour-matched caulk specifically for this purpose.
Common DIY Grouting Mistakes to Avoid
Learning from others’ mistakes saves time, money, and frustration:
• Not Mixing Grout Correctly
Problem: Adding too much water creates weak, shrinking, cracking grout. Too little water makes grout difficult to work with and doesn’t achieve proper hydration.
Solution: Measure water precisely according to the manufacturer’s ratios. Add water gradually, mixing thoroughly. Remember, you can always add water, but you can’t remove it.
• Grouting Too Soon
Problem: Applying grout before the adhesive has fully cured can shift tiles, creating lippage, uneven surfaces, and future cracks.
Solution: Verify the adhesive manufacturer’s curing time requirements and wait accordingly. The patience usually pays off with professional results.
• Poorly Applied Grout
Problem: Insufficiently packed joints contain voids and air pockets that become weak points, leading to cracking and water infiltration.
Solution: Use firm, consistent pressure when applying grout. Make multiple passes if necessary to ensure complete filling. Work diagonally to pack joints thoroughly.
• Not Letting Grout Cure Properly Before Sponging
Problem: Wiping grout too soon pulls it out of joints, creating valleys and uneven surfaces.
Solution: Test grout firmness before sponging. Be patient—waiting an extra 5-10 minutes is better than starting too early.
• Leaving Grout Clean-up Too Long
Problem: Allowing grout to fully harden on tile surfaces makes removal extremely difficult, often requiring scraping that risks tile damage.
Solution: Complete sponging and initial cleaning within the specified working window. Don’t take breaks during active grouting—finish your started section.
• Not Cleaning Joints Before Grouting
Problem: Debris, dust, and old adhesive in joints prevent new grout from bonding properly, leading to weak grout that fails prematurely.
Solution: Thoroughly vacuum and clean joints before grouting. Remove all spacers and debris. For regrouting projects, remove old grout to an adequate depth.
• Wrong Weather or Environmental Conditions
Problem: Extreme heat causes grout to cure too quickly, shortening working time dangerously. High humidity or cold temperatures slow curing and can affect strength.
Solution: In Dubai’s hot climate, work during cooler parts of the day, increase air conditioning, or use chilled water when mixing. Avoid grouting in extreme conditions.
• Not Compacting Grout Adequately
Problem: Lightly applied grout doesn’t fill joints completely, creating voids that lead to cracking and water penetration.
Solution: Apply firm, consistent pressure when packing grout into joints. Multiple passes ensure complete compaction.
• Using Too Much Water When Sponging
Problem: Wet sponges dilute surface grout, wash out colour, and create washed-out, weak joint surfaces.
Solution: Wring sponges thoroughly—far more than feels intuitive. Use barely damp sponges and rinse frequently in clean water.
What Can I Use to Grout Tile if I Don’t Have a Grout Float?
Life happens, and sometimes you need to grout without proper tools. Whilst grout floats are definitely recommended, several common household items can serve as substitutes in a pinch.
Quick Substitutes and How to Use Them
Rubber Spatula (Flexible, Wide):
- Hold at a low angle and push grout diagonally across tiles.
- Use a straight edge to scrape excess off tile surfaces.
- Flexibility helps pack grout into joints.
- Works reasonably well for small projects.
Stiff Plastic Pieces (Container Lids):
- Cut plastic container lids to approximately 6×4-inch rectangles.
- Use a firm edge to scrape grout into joints.
- Provides decent pressure for packing.
- Free and readily available.
- Replace as edges wear down.
Margin Trowel (Small Metal Trowel):
- Good for small areas, patches, or repairs.
- Press grout into joints with the flat side
- Scrape across tiles to remove excess.
- Be careful not to gouge or damage grout lines.
Putty Knife (Wide, Flexible Plastic or Metal):
- Spread and force grout into joints.
- Plastic putty knives are less likely to scratch tiles.
- Keep blade at a shallow angle to avoid digging into joints.
- Works well for wall tiles.
Squeegee (Rubber Window Squeegee):
- Works surprisingly well for large floor areas.
- Use a rubber edge to push grout across tiles.
- Follow with a damp sponge to clean residue.
- Good for smooth, flat tiles.
Sponge-Only Method:
- Many experienced DIYers use only sponges.
- Car wash sponge ideal for floor tiles.
- Household scourers with sponge backs work for wall tiles.
- Push grout into gaps going across them, not parallel.
- Pay extra attention to corners.
- Work in approximately 2 square metre sections.
- Wipe tiles clean and smooth joints within 30 minutes before grout sets.
Piece of Stiff Cardboard or Old Plastic Card:
- For very small jobs or thin grout lines.
- Use firm pressure to tamp grout into joints.
- Scrape off excess carefully.
- Short lifespan, but it works temporarily.
Wooden Block with Rubber Wrap:
- Wrap a small block of wood in old inner tube or bicycle tyre rubber.
- Approximates the rubber face of a grout float.
- Press and scrape as with a real float.
- DIY solution for repeated small projects.
Technique Tips When Using Substitutes
Work in Small Sections: Grout skins over quickly, so don’t attempt large areas with substitute tools that work slower than proper floats.
Hold Tools at Proper Angles: Low angles (20-45 degrees) press grout into joints without gouging. Higher angles scrape excess from surfaces.
Use Diagonal Strokes: Always work diagonally across tile joints rather than parallel—this forces grout into seams effectively.
Clean Tool Edges Frequently: Wipe edges with a damp cloth to avoid dragging hardened grout across your work.
Test on Inconspicuous Areas First: Protect polished or soft tiles by testing substitute tools on scrap tiles or hidden areas to ensure they won’t scratch.
Have Proper Sponges Ready: Even with float substitutes, proper sponging technique remains crucial for acceptable results.
When a Real Grout Float Matters
For large areas, textured tiles, or multiple projects, a proper rubber grout float (costing AED 20-40) speeds work significantly, reduces fatigue, and improves results. Consider it an investment rather than an expense.
Can I Regrout Myself?
Regrouting—removing old, damaged grout and replacing it with fresh grout—is more challenging than initial grouting but still achievable for determined DIYers.
Key Considerations for Regrouting:
Grout Removal is Labour-Intensive: Removing old grout without damaging tiles requires patience and proper tools. An oscillating multi-tool with a grout removal blade makes this significantly easier than manual scraping. Consequently, many DIYers give up halfway through because they underestimate the time and physical effort involved.
Depth Matters: New grout won’t bond well to old grout. Remove at least 2/3 of tile depth (ideally all old grout) for proper bonding. Shallow removal creates weak patches that fail quickly.
Dust and Mess: Grout removal generates significant dust. Wear proper masks and protective equipment. Cover or remove items in the area. Work with windows open or ventilation running.
Thin Grout Lines: Very narrow grout lines (less than 3mm) are extremely difficult to remove and regrout without damaging tiles. Professional tools and expertise often prove necessary.
Tile Condition: If tiles are loose, cracked, or the underlying substrate is damaged, regrouting won’t solve the problem. Furthermore, address the underlying issues before regrouting, or the problem will recur.
When to Consider Professional Regrouting:
- Extensive areas requiring regrouting.
- Valuable or delicate tiles you can’t risk damaging.
- Underlying moisture or structural problems.
- Very narrow grout lines.
- Epoxy grout removal (extremely difficult).
- Limited time or physical capability for labour-intensive work.
DIY Regrouting Success Story: One experienced DIYer reports their regrouted shower has held up perfectly for 10 years after using an oscillating tool for removal and following proper application techniques.
When Should You Call Professional Grout Services?
Whilst many grouting projects suit DIY approaches, certain situations strongly favour professional expertise:
Call Professionals When:
Large-Scale Projects: Grouting an entire house, multiple bathrooms, or extensive commercial spaces becomes overwhelming for DIYers. Additionally, professionals complete in days what might take you weeks.
Epoxy Grout Installations: Epoxy grout’s short working time, specific mixing requirements, and challenging application techniques typically require professional expertise for satisfactory results.
Valuable or Delicate Tiles: High-end marble, glass mosaic, or expensive imported tiles shouldn’t risk DIY mistakes. Professional installers have experience protecting delicate surfaces.
Complex Patterns or Layouts: Intricate mosaic work, herringbone patterns, or installations with numerous cuts and angles benefit from professional experience.
Bathroom Waterproofing Concerns: Showers and wet areas require precise waterproofing systems that DIY errors can compromise, leading to expensive water damage.
Severe Grout Damage: Extensively cracked, missing, or deteriorating grout often indicates underlying problems requiring professional diagnosis and correction.
Time Constraints: When you need work completed quickly for deadlines, events, or rental property turnovers, professionals deliver efficient results.
Physical Limitations: Grouting requires kneeling, repetitive motions, and physical stamina that may prove difficult for some homeowners.
Quality Expectations: If you require absolutely perfect, professional results for high-end properties or discriminating tastes, professional installation ensures satisfaction.
Commercial Applications: Business environments, retail spaces, restaurants, and commercial bathrooms demand professional installation for durability, hygiene standards, and appearance.
Benefits of Professional Grouting Services
Expertise and Experience: Professionals have grouted hundreds or thousands of square metres, mastering techniques through extensive practice that DIYers lack.
Proper Equipment: Commercial-grade tools, specialised sponges, professional-quality grouts, and precise mixing equipment deliver superior results.
Efficiency: Experienced grout specialists complete in hours what might take DIYers days, minimising disruption.
Problem-Solving: Professionals identify and address underlying issues (substrate problems, tile movement, moisture concerns) before they cause failures.
Warranty Protection: Professional installations often include workmanship protection (note: check specific terms with your service provider).
Consistent Results: Professional application delivers uniform joint appearance, proper compaction, and even colouring throughout.
Reduced Risk: Eliminate the possibility of DIY mistakes requiring expensive corrections or tile replacement.
Valuable Time Savings: Your time has value—professional services free you for other priorities whilst ensuring quality work.
Grout King: Your Partner for DIY and Professional Projects
At Grout King, we understand that every grouting project is unique, and we’re here to support you whether you tackle the work yourself or prefer professional installation.
Our Services Include:
Professional Grouting Installation: Expert application for all tile types, grout varieties, and project sizes throughout Dubai and the UAE.
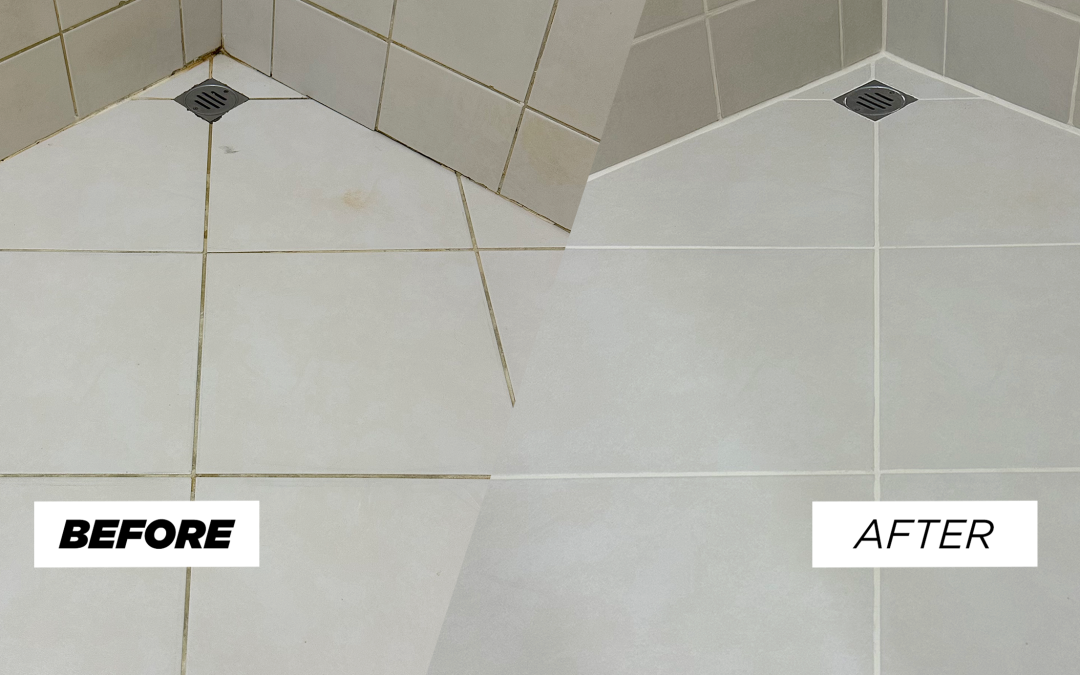
Grout Cleaning and Restoration: Revitalise old, stained, or discoloured grout to like-new condition using specialised cleaning techniques and equipment.
Regrouting Services: Complete grout removal and replacement for damaged, cracked, or failing grout lines.
Grout Sealing: Professional-grade sealer application for maximum stain resistance and longevity.
Consultation and Guidance: Even if you’re planning a DIY project, our experts can provide advice on product selection, techniques, and approaches for your specific situation.
Repair and Correction: When DIY projects don’t go as planned, we can assess, repair, and restore your installation to professional standards.
Conclusion: Can I Grout Myself?
Yes, you absolutely can grout yourself, and many homeowners successfully complete beautiful, long-lasting grouting projects. The keys to DIY grouting success include:
- Choosing appropriate grout types for your specific application.
- Preparing surfaces thoroughly and allowing adequate curing time.
- Mixing grout to the proper consistency and working within time constraints.
- Applying grout with firm pressure using proper diagonal techniques.
- Mastering the sponging technique with thoroughly wrung-out sponges.
- Cleaning promptly and thoroughly before the grout fully hardens.
- Sealing grout after proper curing time.
- Starting with smaller projects to build skills before tackling large areas.
However, certain situations strongly favour professional expertise—extensive projects, epoxy grout, valuable tiles, complex patterns, waterproofing concerns, severe damage, time constraints, and quality-critical applications. Moreover, there’s no shame in recognising when professional help delivers better value through superior results, efficiency, and peace of mind.
Whether you decide to grout yourself or engage professional services, Grout King is here to support your project’s success. We offer expert guidance, quality products, professional installation, and restoration services throughout Dubai and the UAE. For advice on your specific grouting project or to schedule professional services, contact Grout King today—your partner for grouting excellence.