
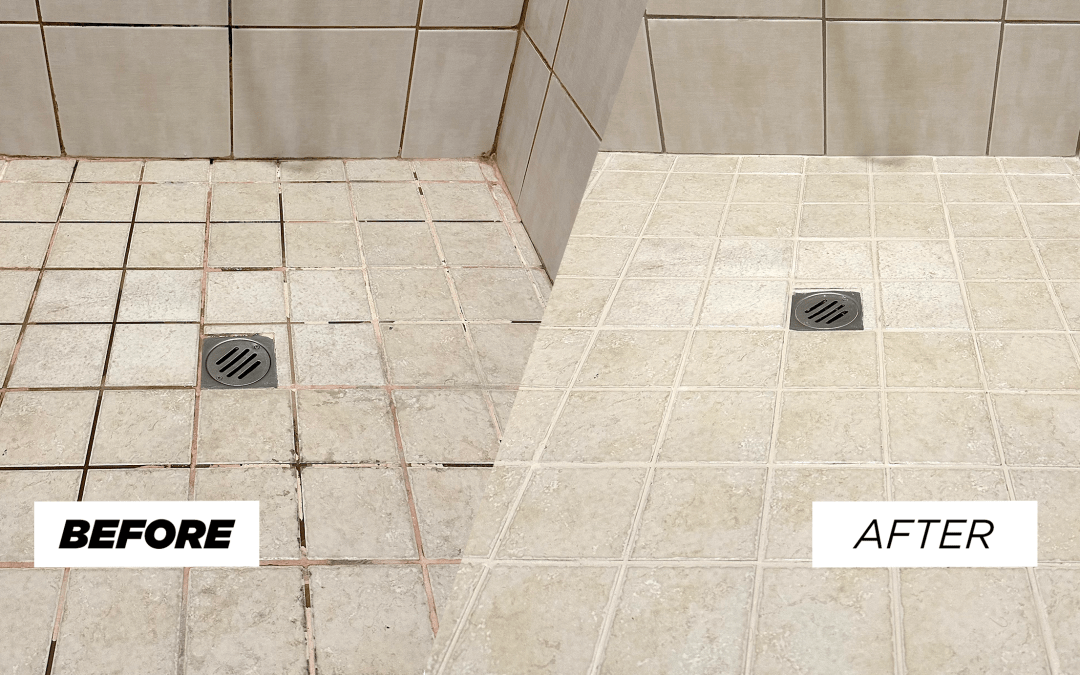
Is your once-pristine white shower grout now looking dingy, discoloured, or downright dirty? Don’t worry – you’re not alone in this battle against grout stains. Moreover, getting your shower grout white again is entirely achievable with the right techniques and knowledge. In this comprehensive guide, we’ll explore proven methods to restore your grout’s original brightness and keep it looking fresh for years to come.
Understanding Why Shower Grout Gets Dirty
Before diving into cleaning solutions, it’s essential to understand what causes grouting discolouration. Furthermore, regular grout is naturally porous, making it a magnet for soap scum, mildew, hard water deposits, and everyday grime. Over time, these substances penetrate deep into the grout lines, creating stubborn stains that normal cleaning can’t remove.
Additionally, factors such as poor ventilation, high humidity, and inadequate maintenance can accelerate grout deterioration. The good news is that with proper techniques and consistent care, you can restore even the most discoloured grout to its original white appearance.
DIY Method: Baking Soda and Hydrogen Peroxide
One of the most effective and affordable solutions for whitening grout involves common household items. This powerful combination works by breaking down organic stains and lifting dirt from deep within the grout pores.
Step-by-Step Process:
Make the paste: In a small bowl, combine about 1/2 cup of baking soda with 1/4 cup of hydrogen peroxide. Mix until you achieve a thick, spreadable consistency.
Apply the paste: Using an old toothbrush or grout brush, spread the paste generously over the stained grout lines. Ensure complete coverage of all discoloured areas.
Let it sit: Allow the paste to soak into the grout for approximately 5 to 10 minutes. This waiting period is crucial as it gives the solution time to penetrate and break down embedded stains.
Scrub thoroughly: Using a stiff-bristled brush or an old toothbrush, scrub the grout lines with firm, consistent pressure. Work in small sections to ensure thorough cleaning.
Rinse completely: Wipe away the mixture with a damp cloth, then rinse the entire area thoroughly with clean water. Proper rinsing prevents residue buildup that could attract more dirt.
Repeat if necessary: For heavily stained grout, you may need to repeat this process multiple times to achieve the desired results.
Commercial Cleaner Method
While DIY solutions are effective, sometimes stubborn stains require commercial-grade products. Professional-strength cleaners can provide more aggressive cleaning power for challenging situations.
Using Commercial Products:
Choose the right product: Select a commercial grout cleaner containing bleach, or opt for an oxygen bleach powder mixed with hot water. Look for products specifically designed for grout cleaning rather than general-purpose cleaners.
Apply the cleaner: Spray the cleaner onto the grout lines or apply the oxygen bleach mixture liberally. Ensure adequate ventilation when using bleach-based products and wear protective gloves.
Let it work: Allow the cleaner to sit on the grout for approximately 5 minutes. This dwell time is essential for the product to penetrate and break down stains effectively.
Scrub and rinse: Scrub the grout lines thoroughly with a brush, then rinse the area completely with clean water. Multiple rinses may be necessary to remove all product residues.
Professional Tips from Real Users
Based on extensive user feedback and professional recommendations, here are additional proven methods:
The Toilet Bowl Cleaner Technique
Many users swear by using toilet bowl cleaner with chlorine bleach. The thick, gel consistency allows for better adherence to vertical grout lines. Apply the gel directly to grout lines, let sit for 15 minutes, then rinse thoroughly with a shower head or hose.
Oxygen Cleaner Method
Create a paste using oxygen cleaner powder (like OxiClean) with warm water. Apply to grout lines and keep moist by periodically spraying with water. This method is particularly effective for organic stains and discolouration.
Steam Cleaning Approach
Professional-grade steam cleaners with scrub attachments can be highly effective for grout restoration. The combination of heat, moisture, and mechanical action helps lift embedded dirt and grime from grout pores.
Advanced Cleaning Solutions
For extremely stubborn stains, consider these advanced approaches:
Hydrogen Peroxide Paper Towel Method
Lay paper towels over grout lines and saturate with hydrogen peroxide. Let it sit for as long as possible (several hours if needed). This extended contact time allows for maximum whitening effect.
Dawn and Vinegar Solution
Mix equal parts water, dish soap, and white vinegar in a spray bottle. This combination is particularly effective against soap scum and hard water deposits.
Professional-Grade Products
Consider using specialised grout cleaning products like Custom Building Products Grout Renew, which not only cleans but also seals and colours grout simultaneously.
Preventing Future Grout Discolouration
Prevention is always better than restoration. Therefore, implementing proper maintenance practices can significantly extend the time between deep cleaning sessions.
Regular Maintenance Tips:
Daily wiping: After each shower, quickly wipe down grout lines with a squeegee or towel to prevent moisture buildup.
Weekly cleaning: Use a mild, pH-neutral cleaner weekly to prevent soap scum and dirt accumulation.
Proper ventilation: Ensure adequate bathroom ventilation to reduce humidity levels that promote mould and mildew growth.
Address issues promptly: Deal with stains and discolouration as soon as they appear, rather than letting them set and become more difficult to remove.
The Importance of Grout Sealing
After successfully whitening your grout, sealing becomes crucial for long-term maintenance. Consequently, a quality grout sealer creates a protective barrier that prevents future staining and makes regular cleaning much easier.
Benefits of Professional Grout Sealing:
- Enhanced stain resistance: Sealed grout repels water, soap, and other common bathroom contaminants.
- Easier maintenance: Regular cleaning becomes more effective and less time-consuming.
- Extended grout life: Protection from moisture and stains helps prevent cracking and deterioration.
- Mould and mildew prevention: Reduced moisture penetration creates an inhospitable environment for microbial growth.
- Cost savings: Preventive sealing is far more economical than frequent deep cleaning or grout replacement.
When to Call the Professionals
While DIY methods can be highly effective, certain situations warrant professional intervention. Consider professional grout cleaning and sealing services when:
- Grout is severely discoloured or stained beyond DIY remedies.
- Large areas require treatment.
- Time constraints prevent thorough DIY cleaning.
- Previous attempts have been unsuccessful.
- You want guaranteed, long-lasting results.
Why Choose Grout King for Your Grout Restoration Needs
At Grout King, we live and breathe all things tile and grout. Our team of experts specialises in grout restoration, repair, and professional grout cleaning services throughout Dubai and the UAE. With years of experience and cutting-edge equipment, we can restore even the most challenging grout discolouration.
Our Professional Services Include:
- Deep grout cleaning: Using professional-grade equipment and eco-friendly cleaning solutions.
- Grout restoration: Bringing severely damaged grout back to like-new condition.
- Grout sealing: Applying high-quality sealers for long-term protection.
- Grout repair: Fixing cracks, gaps, and damaged sections.
- Maintenance programs: Ongoing care to keep your grout looking perfect.
Our commitment to excellence and customer satisfaction has made us Dubai’s trusted name in grout services. Furthermore, we use only the highest quality products and proven techniques to ensure lasting results.
Dos and Don’ts of Grout Cleaning
DO:
- Test cleaning solutions in an inconspicuous area first.
- Wear protective gloves and ensure adequate ventilation.
- Use appropriate brushes (avoid metal brushes that can damage grout).
- Rinse thoroughly after cleaning.
- Seal grout after deep cleaning.
DON’T:
- Use harsh abrasives that can damage the grout texture.
- Mix different cleaning chemicals.
- Ignore safety precautions when using commercial cleaners.
- Rush the process – allow adequate dwell time for products to work.
- Forget to address underlying moisture issues.
Protecting Your Investment
Once you’ve successfully restored your grout to its original white colour, protecting this investment becomes paramount. Regular maintenance, proper ventilation, and professional sealing will keep your grout looking fresh and extend its lifespan significantly.
Remember that grout maintenance is an ongoing process, not a one-time fix. By implementing the techniques outlined in this guide and maintaining consistent care practices, you can enjoy beautiful, white grout for years to come.
Conclusion
Getting shower grout white again is entirely achievable with the right approach, patience, and techniques. Whether you choose DIY methods using household ingredients or opt for commercial products, the key is consistency and proper application. For best results and long-term maintenance, consider professional grout cleaning and sealing services.
At Grout King, we’re here to help you achieve and maintain beautiful, white grout throughout your home. Our professional team combines expertise with state-of-the-art equipment to deliver results that exceed expectations. Contact us today to learn more about our comprehensive grout restoration services in Dubai and across the UAE.